Sunday, September 28, 2008

Escape Hatch Labs


Ian Hanschen has been doing some amazing things with LED matrices at EHL. Check out his stuff.

Check out Ian's soldering job on these LEDs. Notice the RGB LED on the far right - this guy has incredible dexterity.


Tuesday, September 23, 2008

Conductive Toggle Switch on Instructables

Check out the toggle switch that I invented using conductive velcro that have been using on my projects. It's published on the Instructables site.

Sunday, September 21, 2008

Nora Carria

Even though this blog does not focus on my fine sewing and pattern drafting skills, you should know that I do have them. But I really owe that all to Nora Carria, who broke me in. She would throw projects my way and say "I've never done something like this: you figure it out". I did figure some things out, but she was there, when this little sparrow was flapping her wings over a puff sleeve, or a gusset in a crotch, and multiple other pattern drafting dilemmas. She is a fantastic custom clothier and a genius when it comes to flat patternmaking and draping. I was lucky enough to have her as a mentor and I completed my internship with her this summer. She is one of Seattle's best secrets, but I have no intention of keeping it that way.

Contact Nora Carria and ask her to show you the link to her work.

By the way, she came up with the shape of the hat in many of these projects.

Hanging LEDs


Here is a prototype and an idea that I am currently working on for some wall pieces using LEDs. This is basically simple parallel circuit with the conductive thread on the back side of the fabric. I bring the conductive thread through the front and LEDs dangle from it with some simple knots. I'm thinking some of these LED "arrays" could look cool and do some interesting things if there were some sensors inputing some data to make the LEDs blink. And there are always microcontrollers...

Friday, September 19, 2008

Sparrow Makes Another Appearance

I'm not entirely done with this - but it has been a fun quick little project. The outer shell is polar fleece fused on to SewSheer interfacing. The circuits are all conductive. The LEDs are the surface mounts that I soldered crimp beads to.
The switch is in the back and it is conductive velcro. The battery is a 3v lithium ion cell battery that is sewn into the shell and is hidden by the hat - which by the way is beautifully lined in a raspberry acetate.

The sparrow is a little pronounced for my tastes, so I think I will color her.

Thursday, September 18, 2008

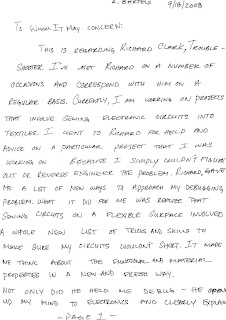
Richard Clark

If you ever need a hand, or just can't figure it out, perhaps you need to try a new approach, or maybe you need to call in a... Troubleshooter: Richard Clark.

Well.. What can I say about Richard -- Why don't you read what I wrote below.

Tuesday, September 16, 2008

Hat II Project - in progress


Here is another hat I'm working on. I am waiting on some resistors from Digikey - but as soon as they come - let the fun begin!

Soldering Surface Mount LEDs


NOT BAD FOR NOT HAVING SOLDERED IN 8 YEARS! :)

I've been working on soldering some surface mount (SMD) LEDs. These LEDs are 1/8" long and a 1/16" wide. I attached these crimping beads that I found at a beading store and I used a fine clean tip with a high gauge solder wire. I think I got some good results. The LED next to quarter (near the a in "Dollar" doesn't have any crimping beads soldered onto it - just to give you an idea about how small I'm working here.

The long leads were an experiment for another small wall piece that I am working on. The LEDs aren't exposed here, just the leads with the crimps attached.

HERE IS A GREAT TIP (One that Ian Hanschen came up with): place the the components face down on a piece of tape and nest the beads next to them. The tape holds the beads in place while you solder them. Also you can tin the bead and gently roll it over to the LED or a lead (Leah Buechley method).


Wednesday, September 10, 2008

Hat


I am moving at a snails pace on the hat...but I am making progress. :) I may leave the circuitry exposed as I am really enjoying the components and stitching exposed.


Bracelet


Here is a bracelet that I knocked out in a few days. All of the stitching is done with conductive thread. The LEDs I found at Vetco in their 100 LEDs for $5 bin. Their old and boxy, so they make really interesting objects in of themselves. I was originally going to cover the bracelet with another layer of felt to cover the circuitry and the resistors, but I'm enjoying the way it looks exposed, so I'll just leave it that way.

Thursday, September 4, 2008

Notes from the Lab 9/08 - Conductive Epoxy

I decided to use conductive epoxy on the connections between my "traces" and connections between traces and components on the hat project. I applied a little dabble in these places on one side of the hat, and I had fantastic results.

Unfortunately, when I applied it to the other side of the hat, I lost parts of my circuit. Yikes! What's happening? I am investigating the situation more. In fact, I've ripped out all of the circuitry on that side of the hat and I am now getting ready to sew it all back on by hand.

Tuesday, September 2, 2008

TEXTILES AND ELECTRONICS LINKS


Vincent Leclerc with
XS LABS

Be sure to check out the SKORPIONS project on this page!

MIT Media's lab
on wearables.

Leah Buechley
Leah Buechley is a researcher that studies soft circuits specifically. She has tons of info for all experience and level types (novice to hacker) plus lots of good links for materials and kits.

SparkLab

Fashioning Technology


The work of Anouk Wipprecht

Fashion designer and artist Hussein Chalayan.

Joo Yoon Paek

New Brave World - Hybrid Scrapyard

XY Interaction. This is really an EXCITING project involving sensors, electronics, etextiles and music. CHECK THIS OUT - IT IS A MUST.

Lucy McRae
is doing some "wow" circuits as well.

Rebecca Horn works with electronics and has been for some time. Her early work uses the body as a point of departure.

Lady Ada is a great Hacker. She works with everything and has great resources and kits for everyone.

Monday, September 1, 2008

CONDUCTIVE EPOXY


I am trying conductive epoxy to seal some of my connections on my circuits. It is QUITE gooey and expensive. These two tubes, which came together, we about $32. I think you can get if for cheaper, if you shop around.

It is a cold solder that is made of silver and resins. The blob closest to the ruler is about 3/8" wide and about 1/16th of inch thick. It has a resistance of about 10 ohms. It takes about 3 hours for it to dry solid.

Saturday, August 30, 2008

Notes from the Lab 8/08


Currently I am working on a project where I have been sewing a circuit into a hat (which is the style of the old aviator hats). It has a felt outer shell and an inner lining made of linen. My intention for this project was to have the circuitry covered by the felt layer and all of the circuits sewn into the linen layer, with the LEDs popping out into the felt layer. Felt is a great fabric to work with because you can make holes in it and it will not fray.

Ian Hanschen drafted out this circuit using the software Circuit Wizard, which is a great way to run a simulation of a circuit if you don't feel like setting it up on a bread board. The circuit is a LED flasher with 8 LEDs. 4 flash on one side of the hat and the other 4 flash on the other side.

I sewed the traces using my sewing machine (with conductive thread in the bobbin) and attached all of the components by hand. What I have discovered is that conductive thread actually contains a great deal of resistance. I am measuring about 80 ohms for every 10 inches of thread.

Here is the originally sewn hat with all of the traces sewn on with a machine.


This will definitley impact how many ohms my resistors may have to be and how long I run my "traces".

When the thread is sewn by hand, I double the thread, creating a bundle, which decreases my resistance by half. I began replacing the traces I had sewn hand stitched lines.


The other issue I seam to be running into is when the hat lays flat the circuit seems to work, but when it flexes, I loose connections. I believe this is because the connections between the thread and the components are not strong enough. Each time the hat is flexed the joint between the components and thread is articulating too much, causing it to short. I've also noticed that when I bring 2 traces together, I am also not making good contacts. Below is an example.


Back in the lab...shooting trouble, until I remedy these issues.

Later...

Saturday, August 16, 2008

PROTOTYPE


Thanks to REACTIVEfashion on Instructables for their ideas on how to do this...

Below is my first experiment with sewing with conductive thread, building a simple circuit in a fabric and making a switch from conductive Velcro.


Conductive thread is available from a number of suppliers and the spool I used was from Sparkfun Electronics and is a two-ply thread.

To use conductive thread in a sewing machine, I suggest putting the thread in the bobbin. If conductive thread is used in the needle thread, the tension of the stitch tends to loop and it becomes messy on either face of the fabric.
Wind the bobbin as you would any other on your machine. If the conductive thread comes on a cone larger than your machine is capable of holding, just firmly hold it on a flat surface, at the base of the cone, and wind the bobbin as normal.

Next, I stitched, with conductive thread, two parallel lines: one, which was the ground and the other positive. I left about an about inch in between the two lines. I also marked the fabric, with a pen, closest to the positive side to remind me which line was positive. At the end of the positive line I stitched the male piece of some Velcro (aka the hook side).

After I sewed these two lines, I was careful to leave long thread tails to attach components or to securing to other lines that might be needed to complete the circuit.


Since the bobbin thread typically faces the back side of the fabric when sewing a straight stitch, I had to be conscious that the right side of the fabric would be the reverse of any regular sewing project. So, I went ahead and marked the front and the back of this prototype too.

Crimp the leads on the LEDs for attaching to fabric with thread. For LEDs that have long leads, it’s easy to crimp the leads around a needle nose pliers. All you have to do is bend the leads so that they are at 90-degree angles from the LED, and then, simply crimp the leads into little beads on either side. If you are using surface mount LEDs, SMD, you will have to solder small metal crimp rings to the anode and cathode sides of the LEDs. Here is the before and after.


Also, VERY IMPORTANT, mark the leads that are positive with a permanent marker or nail polish because when the leads are bent into beads, you wont’ be able to tell which side is the anode or the cathode.

A note about LEDs: If you are going to use different colors, make sure you use the proper resistors because some LEDs will eat up the juice of your circuit. You can always use the LED resistor calculator website if you are unsure. http://www.ledcalc.com/


Next, I attached the LEDs by hand sewing them to the positive and negative lines of the circuit. When tacking by hand, I first took a small stitch over the machine-sewn line, and then crossed over it again, to make sure that the initial hand stitch was making contact with the sewn lines.

Then, I securely attached the LEDs. In the photo below, I am attaching the LEDs to the positive side first. Quadruple tight tacks allowed the contacts to remain secure.
Then, I sewed individual lines from the ground line to the other side of the LEDs.


The form, I created with this simple prototype, is a tube, which, required the Velcro switch to be on the front and the back. So as you can see (pls look below) the hook part of the switch is on the front and loop side of the Velcro is on the back.


I hooked up a 3.7V lithium ion rechargeable battery (approximately 2cm X 1cm X .5cm) and closed the Velcro switch and voila! Let there be light!


Monday, August 4, 2008

Textiles and Electronics

My interest in electronics and textiles started about 8 years ago. As a student at the University of Washington, I attended a lecture by Marie O'Mahony, who had been invited by the Electrical Engineering Department, to speak about her work. I was a student in the Fiber Arts and Sculpture program and the bridge between textile and technology intrigued me (and it still does today). (At the time I had been experimenting with the BASIC Stamp and tinkering with music boxes and putting them in soft objects). The body of work she presented consisted of garments, with the wiring attached to them, which kinetically moved them into different forms. For example, she created a series of dresses and skirts in which the hems on them were raised using a series of circuits.

O’Mahony’s innovation was making garments kinetically move without the physical interaction of either the human wearing it or another individual using physical force to alter it. The work was presented in conjunction with her book "Techno Textiles". However, the technology used in these pieces, was awkward and distracting. Furthermore, it worked against the functionality of the pieces. The power supplies on the garments were large, heavy battery packs and they were not attached to the human forms or the garments. Rather, they lay at the side of the model, which only allowed the model stationary movements. The wiring was boldly exposed and it made the viewer wonder if this was the desired aesthetic or simply a sacrifice for the new kinetic movements. Despite these formal functional distractions, the work was still a breakthrough in wearable technology.

Wearable technology and computers will soon be commonplace. How our clothes technologically behave, along with aesthetical appearance, will factor in to how we choose what we want to wear.

Clothing is an extension of ourselves and plays a key role in how view ourselves and how others view us within the culture we operate in. Culturally speaking, clothing is a marker. It communicates an individual’s class, sex, economic status, mood, and subculture within a society.

And one can’t help but draw a conclusion between “e-textiles” and our culture’s interest in the cyborg.

The conceptualization and contemporary imagery of the cyborg is probably rooted in the past. It is possible that we first conceived of the image of a cyborg, in its infancy, when we began using prosthetics in medicine. The development of imagery of the cyborg assumed solid shapes, because those shapes were the most physically functional. Imagery and artistry of the cyborg, in the past, has typically assumed that the additions of computers and electronics would be in solid materials. The chip, attached to the board, was always a solid material with little fluidity. And wiring, of any complexity, had to be baked with solder onto a PCB.

What if we could make circuits fluid and flexible? What if we allowed the form of circuits to follow the body or the shape of the garment or textile?

Let's make the case for conductive thread. It is flexible, can be stitched or woven into a textile or garment. With a little ingenuity, we can also eliminate the need for solder. Most importantly, it eliminates the PCB. It allows the garment and the textile to maintain its form, drape and fall freely. By stitching/weaving into the garment we can produce a freely flowing circuit board.

Let’s make the case for conductive inks that can be silkscreened onto fabric. Silkscreening is already used in a variety of applications on PCBs. So, why not silk screen directly onto fabric and add electrical components to it? A screen, with a breadboard like grid, could be printed onto fabric. Individuals, or possibly the wearers themselves, could attach components and be the designers of their own electrical circuits. And this would allow one to interact and change the appearance of a garment.

Please explore the links below. Have fun! We’re just beginning…

Vincent Leclerc with XS LABS

Be sure to check out the SKORPIONS project on this page!

MIT Media's lab
on wearables.

Leah Buechley
Leah Buechley is a researcher that studies soft circuits specifically. She has tons of info for all experience and level types (novice to hacker) plus lots of good links for materials and kits.

SparkLab

Fashioning Technology


The work of Anouk Wipprecht

Fashion designer and artist Hussein Chalayan.

Joo Yoon Paek

New Brave World - Hybrid Scrapyard

Saturday, August 2, 2008

PHOTOS


PHOTO: ANNA BARTELS CIRCUIT: ANNA BARTELS
Gimme Baby Robots Show, Portland and Milwaulkee


PHOTO: ANNA BARTELS
LED MATRIX: IAN HANSCHEN